Tuesday, June 30, 2009

J'Adore!

It was so humid this morning that when I was taking Isabel out for a walk, I could see my own breath. You read that right. It was about 60 degrees outside, and the air was so WET that I could see my own breath. Disgusting.

In an effort to forget the weather and the ickies that result, here are some pictures of things that I absolutely adore. Some of these are projects that I’m currently copying or plan on copying in the near (or semi-distant) future.

I love plates. And I love them on walls, though I didn’t know this until I began trolling the internetssss about a month ago. These colored plates are great, arranged all together and all complimentary in their greens and pinks. I love how this person (unknown to me since I didn’t mark where I found the pic – oopsie) managed to put pink and green plates on a blue wall without looking like an idiot. And I love those candlesticks. Love them!


This picture, from County Living, was one of the first pictures I saved onto my jump drive. The chaisse lounge is beautiful, and I love the pink plates of different designs on the wall.


This platter mirror from Martha Stewart Living is a project that I want to tackle if I can find a platter that I like in my yard sale/thrift store travels. The mirror just needs to be cut by someone with a glass cutter, and they’ve also added pillow piping to the edges of it to give it more texture. The mirror only appears to be hanging from the ribbon. They’ve secured it with a plate hanger and added the ribbon afterward. Cuteness!!


Another project that I can’t wait to finish is a shelf that I acquired from a thrift store for $3. I’ve painted it, distressed it a bit, and now am just waiting for hubby to hang it tomorrow. This picture from Better Homes & Gardens reminded me of it, so I saved it for inspiration.


Someday, when we have our own home, I'd love to cover a wall in a wallpaper like this one. It's beautiful, but a teensy bit too crazy for a whole room. Blue + Damask = Instant Love Affair in my world. This photo is also from BHG.


This photo, from DIY Ideas, draws me in every time I look at it. I'd love to find a gorgeous, ornate frame like this. Paint it a pretty color. Add a map of Block Island, where Scott proposed. It would be so very Rhode Island, and perfect for our home. I'm keeping an eye out for one!


I'd love to cover an entire wall in literature. This is also from DIY Ideas, and it's one of the more creative wall coverings I've seen. They used dictionary pages, but I'd love to do it with pages from a "Complete Works of Shakespeare" edition. I just don't know if I could bear to cut one up. It's too Fahrenheit 451 for my liking.


I'm impressed with myself that I wrote down the photo credit for this one. It's from Rate My Space, and the user was Momma2Be. How adorable is this nursery? I love its simplicity and the use of moulding to divide the wall. That vinyl design is perfect, and I love the colors she chose. And check out that gorgeous little chandy!!


After my headboard post, I found the perfect one for us on Martha Stewart Living. Inexpensive and adorable. I'm going to attempt to make my own quilt. It'll be simple, and it'll be my first. And it'll likely be a year in the making. But it's in the works! Scott and I also want to add a moulding shelf above it for frames and vases, etc. It's going to be awesome.


It's a bit too late in the season to start this next project, but it's a definite possibility for next year. Martha rocks my socks again with this invisible trellis idea. They made it with eyehooks screwed into the wall and med gauge wire. I'm thinking morning glories or some other kind of climbing, flowering plant. So pretty!


This nautical themed ribbon garland is easy and looks like it would be great for outdoor parties. You could also use different colors for different seasons! And yep - Martha again. No real surprise there.


A romantic, easy way to display flowers and vases simultaneously. Martha comes through in a pinch.


I'm doing a version of this last project very soon. As soon as I can get my hands on some sand. Which should be easy, since we're going to Portsmouth for dinner tonight. Maybe I can snag a tupperware container of it before we head back inland on the way home.


That's it for now! Have a happy Tuesday!

Saturday, June 27, 2009

Six Flags Day

Our company paid for everyone to go to Six Flags, New England yesterday. It went off without a hitch, and everyone seemed to enjoy themselves, so I consider it a success! It was the very first event that I've ever planned - I'm so glad that it went well. I took a few photos, but since bags aren't allowed in most ride lines I didn't have my camera on me as often as I had thought I would.

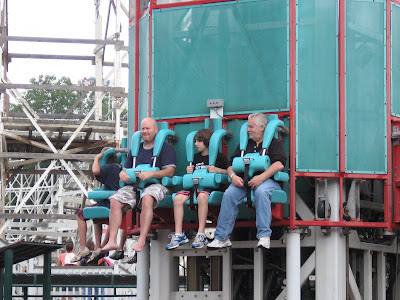
As soon as we stepped inside the gates, we made a beeline for this ride, aptly named "Scream".


I definitely screamed. Like a little girl. It raises you up in the air, all at once and unexpectedly. And then it raises you to the very top, and drops you without warning. So two scares in one ride. Perfect! You can see we had lovely weather. ^_^ Here's a nice pic of our COO (to the left), a random child, and our Patient Advocate (to the right).


My team consisted of one of our java programmers, myself, and our HR Director (my boss - who is awesome, BTW. No joke.) Scooby and Scrappy were unfortunately not part of our team.


Another team got an awesome photo with Wonder Woman and Robin, the Boy Wonder!


Since it wasn't too hot out, there were lots of characters out and about all day. Here's a nice shot of Bugs Bunny's bum. Also some other folks you might recognize! Daffy and Pepe!


This guy, from the commercials, is much more creepy in person than you might think. Very weird.


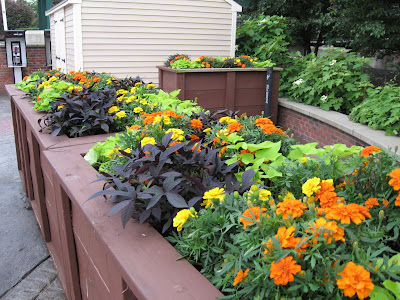
One of the things I was most impressed with were the flowers throughout the park. Their gardeners/landscapers did a fabulous job. Check these out!


I wish I could create hanging baskets like those! The mixture of flowers and different colored and textured leaves makes for a fabulous palette...

Thursday, June 25, 2009

Free Paint?!?!

Check out the email I just received...

Get Ready To Roll (Or Brush)!

Congratulations! Your order number 50611 for one quart of GLB25 Rich Navy Glidden paint (Eggshell sheen) has been processed and is on the way. You can expect to receive your paint in 3 to 4 weeks.

WOW!! Thanks to Jen at Balancing Beauty and Bedlam for news of this amazing giveaway! All you have to do is go to this website to sign up for a free quart of paint. For reals.

Christmas in June. Whodathunk.

T Minus 22 Hours

Tomorrow is D-Day for the company’s trip to Six Flags, New England. Let’s get you excited about it too. Here are some fun photos. The Superman Ride of Steel....


And from the top...


The Mind-Eraser...


This whole she-bang has been planned by yours truly, so I’m a wee bit nervous. Charter bus is paid for and confirmed. Tickets, meal vouchers, park maps, and photo scavenger hunt instructions are printed out and divided into personalized welcome packets for each employee. Prizes are approved and ready to go. We’ve arranged a bus challenge, which will be the first team building exercise of the day.

Each person has submitted a fun fact about themselves that not many people know. Mine is “I once had a piece of artwork featured in a state art show.” No one here knows that I’m artistic, but if they use their imaginations they should be able to figure it out. When we run out of these questions, we’re moving to Trivial Pursuit. We’ll do a bunch of those until people get rowdy, bored, or physically combative. Whichever happens first. The prize for the winning team is a Flash Pass, which allows the group to greatly lessen (oxymoron, whoa) the amount of time waiting in line. Highly coveted. By me especially.


The photo scavenger hunt is going to be awesome. I made this one up myself! I got help with a few of the items, but the coup de grace is for employees to find look-alikes of the upper management team (CEO, VP, COO, etc) and to ask the random park guest to take a photo with the group for extra points. Ought to be interesting!

I promise to post pictures from our trip. And hopefully some funny ones from the scavenger hunt.

Wednesday, June 24, 2009

Girly Toolbox

I like things that are pretty. Don't get me wrong - I'm a bit of a tomboy as well. I can drive a car with a manual transmission, I check my car's fluids regularly, I refuse to call AAA when I get a flat tire because I know how to do it myself and I love getting into the dirt and using the car jack like I'm on a NASCAR pit crew. That said, I like skirts and manicures and flowers and curling my hair. So when I wanted all of my new gadgets and DIY tools in one spot, I knew who to call.

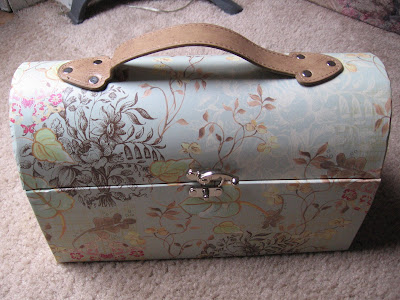
Allow me to introduce a friend of mine. I bought this decorative, hinged box at HomeGoods about a month ago and didn't quite know what to do with it. I just knew that I loved it to pieces. Not literally into pieces, since it IS pretty sturdy.


As I gathered all of my goods, I knew that I needed to get them all together in one place so that I wouldn't lose anything. (I'm notorious for that.) This box handles the job with style! Here are some of the things I gathered together before I started filling it up.


Let's see, we've got a hammer. (Like Captain Hammer. Whedon fans, anyone?? Anyone?? Buehler?) Pliers. Check. Screwdriver? Check. So what else could I need in my toolbox? Wire cutters. Beads. Pretty ribbon. White paint for ceramics. Spray paint gun (not yet used, but soon to be my new best friend). Thread for my curtains. Tape measure.


I also added these items from our junk drawer. Why show you everything? One, I know you're DYING to know. And B, this can serve as an index for my husband for all of the things that I stole from his toolbox. If you can't find anything, sweetie, please reference above photos. And don't be mad if I also stole some items that are not pictured. Love you!


Just to prove that everything fits, here it all is. I also added my painter's tape, some nails... you get the idea. It won't look this neat for long. I intend to use it constantly!

P.S. We're on day 42 and a million for this rainy weather. Everything is moist. Eck. Someone send us some sun!

Monday, June 22, 2009

DIY Ottoman (The Footrest, Not the Empire)

Last week I found an old ottoman at the local thrift store for $6.99. The fabric was heinous, but it was a sturdy piece. I even sat my big ole butt down on it in the store and wiggled around to see if it would hold me up. It passed the test, so I gave it a mental high five for its success and tossed it into my cart.


So I took it home and started my first DIY furniture recovery/reupholstering. If you could even call it reupholstering, which I kinda think you can't. You'll see. P.S. Excuse the dark photos. I take all these over by my patio door since it's the best source of natural light that we have in our apartment. However, it's been raining for about 40 days and 40 nights, so our light hasn't been the best.


Anywho. So back to Ottoman Empire Redo. I took the legs off. I'll likely paint them antique white during my next project. (It's easiest for me to do several things at once, since I only have the outdoor patio for a painting studio. That and it was raining. Ahem. Big surprise.) One of them is missing the metal on the bottom. I'm not too concerned.


I unscrewed the metal brackets (??) that hold the legs in place.


It's always nice to have a furry detriment helper. I told you she loves DIY projects!


I removed about 1,000 staples (give or take) from the underside of this beast, as well as a few nails that are old enough to be my grandmother.


When I removed the backing, I realized that someone else had already done a recovery on this thing years ago. I'll forgive them for their fabric choice given that it was probably about 25 years ago. Seriously.


Here it is, stripped of the old fabric and old white quilt that was used as batting.


Yes, that's ANOTHER type of material that you see under there. That's because this is what it looked like underneath:


All right. For real, this thing is OLD. I am NO good with this stuff, but under the leather (faux leather???) it's filled with HAY.


Do I know how to pick 'em or what? Eesh. At this point, it was time to replace the material with some of my own choosing, so I pulled out my handy new hardware that we bought at the store's grand opening on Saturday. That's right. We didn't own a staple gun. I know, I know. We have one now. And some staples that are mondo-insane-humongous, so don't choose this size... I'll buy a few sizes down next time. Oopsie. Lesson learned.


I put the old quilt right back on it. And I don't even care. Free batting. And it didn't smell. That bad. Febreeze, okay? Works wonders. Besides, the whole project will end up being a kitty bed/perch/throne/scratching post in a few days anyway so "eh".

I didn't take a picture of it, because it was flat and beat up, but I used an old (OLD) pillow for extra cushioning. So there's the old leather. And then an old pillow over that, and an old quilt on top of that. I stapled the quilt to the wood to hold it all in place. Then, I added my material and stapled that in place as well.


Fold the material like you're wrapping a christmas present. (If I could wrap all of my presents with a staple gun, I'd be a happy girl.) This looks less like "wrapped present" than "awful mess" but it was going to be hidden under the backing anyway.


Some of my sides turned out nicely. We'll focus on those.


I replaced the old cardboard-y backing, and screwed the metal leg braces back on (easier said than done, I'll add).


Here's the detail of the material, which I chose for kitchen curtains that I'll be sewing together soon. I made sure than I still have enough for a valance. I liked the cream and red flowery toile pattern. It ought to country-up our little apartment. The picture keeps posting vertically even though I have it saved horizontally. Go figure. ^_^


It was getting quite dark, so the final "after" shot is with a flash. Ick. Someday when the sun comes out I'll replace this photo with a nice one.


It still needs a nice trim for the bottom edge, but for now I like it a whole lot better than what it looked like before. It's a lot more comfy, too, although slightly lopsided since our pillow was not in the best of shape.

Hopefully, someday I'll be so awesome at this that I'll look back at this post and laugh my bum off at how terrible it was. But for now, it works for me!

Stay tuned for the final result of our photo wall, which is my next project.


This room needs lots of work, but adding something (anything) to this wall will be a nice start. As you can see I already arranged everything using cut up paper bags from the grocery store and some painter's tape... It's SO CLOSE to being done, I can taste it!